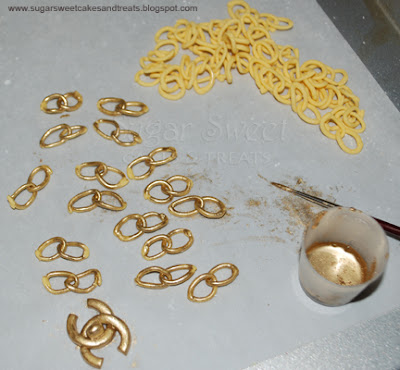
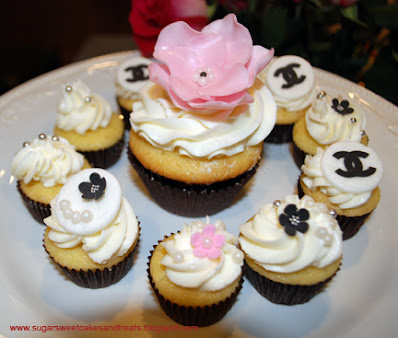
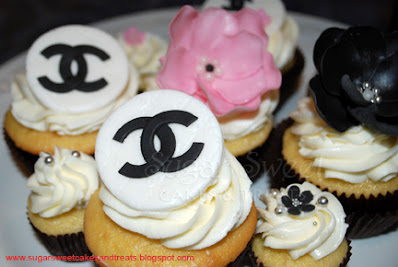
Here are the photo's of the process with a tutorial on how I replicated the purse features in sugar.
Disclosure: This post may contain affiliate links and if you click on the link and purchase the item, I may receive an affiliate commission at no extra cost to you.
Two days prior, I made the Black MMF using black candy melts. The recipe can be found under one of my blog pages as well. You can also use brown chocolate or candy melts to make black MMF. Either one will give you a nice dark base to start with and you will only need to add a few drops of AmeriColor Super Black Soft Gel Coloring Paste to it to get it darker.
I did use the Merckens Melting Wafers in Dark Chocolate to make the black MMF for this cake.
One day prior, I made the flower blossoms, flower petals, and the Chanel logos for the cupcakes with MMF (I mix the MMF with Gum-Tex Powder to help it dry faster and harder like gumpaste). I also made the chain links to use for the purse straps with MMF too.
I made over 100 links and only joined them in two's (you'll see why later). I lay them over popsicle sticks so that they would dry with some curvature to them rather than being plain and flat.
I baked a 10" square cake (10 inch wide purse), and cut it down into 3rds. Each tier was 2 1/2 inches wide by 2 inches tall (6 inch high purse).
Carved the cake to the shape of the purse and covered it over in Italian Meringue Buttercream (IMBC). I also inserted 2 dowels down the middle to help hold the purse up since it was narrow and tall. Then, I put the entire cake into the fridge overnight to get nice and firm.
The following morning, I covered the cake over in Black MMF.
The 1st piece I did was the front of the purse. I rolled out the MMF and trimmed it to size. I also used Dark Cocoa to dust the surface with rather than Powdered Sugar or Corn Starch to help keep the MMF from sticking to the table top. It was great at giving the purse a dark, brown look that matched the color of the purse perfectly. Using a ruler and a stitching wheel (a sewing tool), I scored the quilt design over the MMF. Flipped the MMF over so the underside was now facing up, and rolled 1/8" of the edge over and all around so you wouldn't see the cut edges - I wanted to seams to look just like they were sewed together just like the seams on a real leather purse - hope that makes sense. Flipped the MMF back to the right side and lay it over the front half of the cake. With a fondant tool (a small ball tool will work too), I went over the quilt seams and lightly pressed it into the cake slightly to give it a little bit of a puffed up look.
The next piece I lay, covered the back of the purse and went up and over the front of the cake for the flap. I then added the 2 side pieces following the same technique above with scoring the quilt pattern and rolling the edges under. Lastly, I lightly rubbed the entire purse with a little bit of shortening to make it look more like leather.
Laying each pair of links on the cake and threading the leather strap through it was a bit of fun. I cheated though, be mimicking the leather strap that is threaded through the chain by only using strips of black MMF cut into 1.5 inch pieces. I pinched in each end and shoved each leather pieces into each link giving it the illusion of the strap going up and down through.
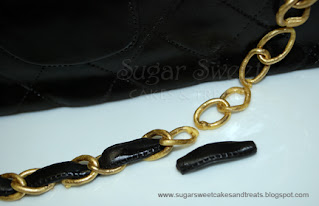
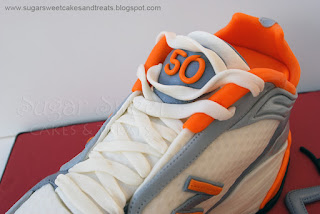
I used the same technique when adding the shoe laces on the sneaker shoe cakes I had done before...see them below:
Now you can see why I only connected 2 gold chain links at a time to each other when first making the chain. The part of the links that are under the black strap are not seen so therefore, do not need to 'actually' exist - It's a cool illusion and made making the gold chain easy and less stressful, hah!
I looked over so many purse cakes trying to figure out how the straps were done on the cakes that did have edible straps and didn't like what I saw, so after playing around with the links, I came up with my own technique....at least I haven't seen anyone who has done it this way or at least shown us how Now, with this tip, I hope to see much better chain links out there by you all :-)
I used clear piping gel to help hold all the links up against the cake and onto the cake stand.
The 'minor' imperfection that really bugs me is that on the following day, since we didn't eat the cake on the night of the party, I took the photo above, outside in the morning light. You will notice, the cake did settle and the 2 dowels used to help stand the cake up appear as bumps up along the top of the purse...err! I've been told, by a dear friend, that it's actually a bulging wallet full of cash - got to love her! Note for next time, I'm cutting those things down at least 1/4 inch lower than the actual cake to avoid such an awful bump...Live and Learn!
As for the large flowers, I made them up. These were the very 1st flowers I've ever made petal by petal. There are 5 medium petals for the inside and 5 large petals for the outside all glued together with piping gel. The large, pink flowers are dusted over in pink luster dust and I added pearls of white, silver and black in an assortment of sizes to the middle of each flower and mini blossom. I just love how they turned out but I do need to take some classes and learn the real way to make flowers one day.
I made both regular and mini sized cupcakes frosted with IMBC and topped with the Chanel inspired decorations. The white, round disks have the quilt pattern on them too which is hard to tell from the photo. The C's for the logo were made using circle cutters.
And alas, 3 days later, we finally cut the cake....and ate it too.
Two days prior, I made the Black MMF using black candy melts. The recipe can be found under one of my blog pages as well. You can also use brown chocolate or candy melts to make black MMF. Either one will give you a nice dark base to start with and you will only need to add a few drops of AmeriColor Super Black Soft Gel Coloring Paste to it to get it darker.
I did use the Merckens Melting Wafers in Dark Chocolate to make the black MMF for this cake.
One day prior, I made the flower blossoms, flower petals, and the Chanel logos for the cupcakes with MMF (I mix the MMF with Gum-Tex Powder to help it dry faster and harder like gumpaste). I also made the chain links to use for the purse straps with MMF too.
I made over 100 links and only joined them in two's (you'll see why later). I lay them over popsicle sticks so that they would dry with some curvature to them rather than being plain and flat.
I baked a 10" square cake (10 inch wide purse), and cut it down into 3rds. Each tier was 2 1/2 inches wide by 2 inches tall (6 inch high purse).
Carved the cake to the shape of the purse and covered it over in Italian Meringue Buttercream (IMBC). I also inserted 2 dowels down the middle to help hold the purse up since it was narrow and tall. Then, I put the entire cake into the fridge overnight to get nice and firm.
The following morning, I covered the cake over in Black MMF.
The 1st piece I did was the front of the purse. I rolled out the MMF and trimmed it to size. I also used Dark Cocoa to dust the surface with rather than Powdered Sugar or Corn Starch to help keep the MMF from sticking to the table top. It was great at giving the purse a dark, brown look that matched the color of the purse perfectly. Using a ruler and a stitching wheel (a sewing tool), I scored the quilt design over the MMF. Flipped the MMF over so the underside was now facing up, and rolled 1/8" of the edge over and all around so you wouldn't see the cut edges - I wanted to seams to look just like they were sewed together just like the seams on a real leather purse - hope that makes sense. Flipped the MMF back to the right side and lay it over the front half of the cake. With a fondant tool (a small ball tool will work too), I went over the quilt seams and lightly pressed it into the cake slightly to give it a little bit of a puffed up look.
The next piece I lay, covered the back of the purse and went up and over the front of the cake for the flap. I then added the 2 side pieces following the same technique above with scoring the quilt pattern and rolling the edges under. Lastly, I lightly rubbed the entire purse with a little bit of shortening to make it look more like leather.
Once the cake was covered, I got started with the details. I painted each link with edible gold dust mixed with vodka (vodka dries quickly and leaves no residue behind). Tedious but well worth it - you have to have a gold, Chanel chain!
Update: For those that have asked, the Gold Dust I use (according to its label) is, 24 kt. Gold Dust, Non Toxic (2gr.) #C409. I was not able to find the same one online for you all to purchase, but there are a few edible, gold dusts that you can try. Different brands will produce different sheens and shades of gold though so it's best to have a few for different decorating needs.
To use, add a little bit of vodka to the Gold Dust to create a thin paste and then, you need to dab it lightly onto the fondant pieces or use really short brush strokes. If you use too much vodka, the gold dust will get too thinned out and won't give you a solid coverage. If your fondant is greasy and the dust is not sticking, lightly brush some corn starch over the fondant first, then try painting it over again. Once dry, you can go back over the bare spots by lightly dabbing more gold dust with Vodka on it.
Almond Extract, Lemon Extract or Vodka work as great, painting mediums mixed into petal dusts, gel food colors, or gold/silver/pearl dusts since they dry almost instantly and do not leave any sticky residue behind,
I then cut 4 circles of MMF out from the top of the purse (2 in the front and 2 in the back) using a piping tip. The holes were then covered over with round circles made out of MMF which were also brushed with gold dust.

I used the same technique when adding the shoe laces on the sneaker shoe cakes I had done before...see them below:
 |
| Tennis Shoe Cake |
 |
| Running Sneaker Cake |
I looked over so many purse cakes trying to figure out how the straps were done on the cakes that did have edible straps and didn't like what I saw, so after playing around with the links, I came up with my own technique....at least I haven't seen anyone who has done it this way or at least shown us how Now, with this tip, I hope to see much better chain links out there by you all :-)
I used clear piping gel to help hold all the links up against the cake and onto the cake stand.
To make clear piping gel, visit my, Bumble Bee Baby Shower Cake post and it's toward the very bottom of the page (Piping Gel = Gelatin + Water + Corn Syrup).
The 'minor' imperfection that really bugs me is that on the following day, since we didn't eat the cake on the night of the party, I took the photo above, outside in the morning light. You will notice, the cake did settle and the 2 dowels used to help stand the cake up appear as bumps up along the top of the purse...err! I've been told, by a dear friend, that it's actually a bulging wallet full of cash - got to love her! Note for next time, I'm cutting those things down at least 1/4 inch lower than the actual cake to avoid such an awful bump...Live and Learn!
As for the large flowers, I made them up. These were the very 1st flowers I've ever made petal by petal. There are 5 medium petals for the inside and 5 large petals for the outside all glued together with piping gel. The large, pink flowers are dusted over in pink luster dust and I added pearls of white, silver and black in an assortment of sizes to the middle of each flower and mini blossom. I just love how they turned out but I do need to take some classes and learn the real way to make flowers one day.
I made both regular and mini sized cupcakes frosted with IMBC and topped with the Chanel inspired decorations. The white, round disks have the quilt pattern on them too which is hard to tell from the photo. The C's for the logo were made using circle cutters.
 |
| The cake is on the pedestal while the 2 purses on the table are the non-edible, real ones. |
And alas, 3 days later, we finally cut the cake....and ate it too.

+b.jpg)


