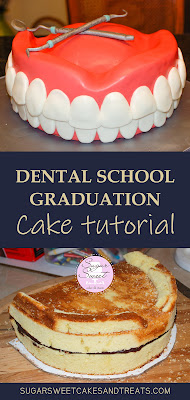
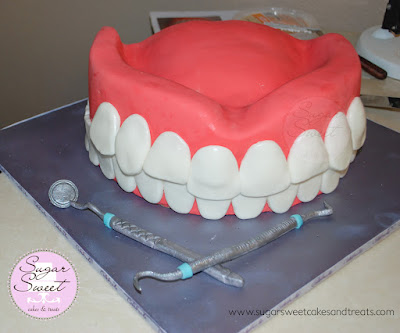
This was very unique and fun cake to make for a friend’s husband graduating from Dental School. Below is a brief explanation of how we pulled the cake together by baking a doctored cake mix, carving the dentures from the cake, covering it in marshmallow fondant (MMF), and making anatomically correct teeth with fondant.
She wanted to learn how to decorate cakes; this was the second cake we worked on together. Just a few months ago, we had a group of friends together to make her the Safari Baby Shower Cake and I taught them, how to bake an easy, doctored cake, how to make marshmallow fondant (MMF), and ganache, how to fill, crumb coat and prep a cake to be covered in fondant, how to make fondant cutout decorations...basically, everything from start to finish. Now, she wanted to make another cake and learn more. With this cake, there wasn’t much we could do ahead of time aside from baking and making the MMF. There is a page on this blog dedicated to making MMF including tips and hints on how to work with it. Find it HERE, Marshmallow Fondant (MMF) Recipes.
Disclosure: This post may contain affiliate links and if you click on the link and purchase the item, I may receive an affiliate commission at no extra cost to you.
The marshmallow fondant we made used Strawberry Jell-O Mix to get the pinkish base color and flavor that tasted and smelled like bubblegum...it smelled super delicious. We did a little Americolor Super Red to the MMF to get it to the perfect shade of pink for the gums.
We baked a doctored, Pink Lemonade Cake (see recipe below), filled with chocolate mousse, and covered with semi-sweet chocolate Ganache.
The cake was large and needed to feed 60 servings. We made a double batch of MMF and doubled the cake recipe for 14 cups of batter to make two, 9x13 sheet cakes.
I have created some neat charts breaking down the number of servings each cake shape and size yields. It also shows the amount of cake batter needed to fill each cake pan size, and the amount of frosting needed to fill and torte: It's AWESOME! I keep a printed copy in my recipe binder to refer to easily. Get my charts HERE, Serving Sizes and Baking Charts.
After the cakes were baked we kept them in the freezer overnight so that the cake can freeze hard and make it easier to carve. We first stacked the cakes together with a piece of parchment paper between each layer so that we could carve the basic outline of the mouth. Once we had the shape done, we separated the layers and then filled them with chocolate mousse. The extra cake pieces we had carved off the cake were used to build the roof of the pallet. The whole cake was then crumb-coated in Chocolate Ganache.
We covered the cake with MMF and then made each tooth individually out of white MMF. This was the most fun but also difficult step to do. I had printed out a bunch of teeth photos to use as a guide to sculpting each tooth as realistically and proportionally as possible. The cake was for a dental grade and the teeth had to be anatomically correct and perfect! We brushed the back of each tooth with water to act like glue and attached them to the cake. The teeth were a little heavy and kept sliding down. We kept shoving them back into place until the water and fondant fused together and gripped the teeth into place.
We also covered the 16”x16” cake board with a grayish-purple MMF to resemble a metal tray. Sprayed the whole board with a can of the Duff Cake Graffiti in Metallic Silver*: One spray can barely covered the board although the instructions on the can said that it would lightly cover six 8” round cakes. The spray worked perfectly for the effect we wanted and it was so much easier to use than me having to brush silver pearl dust manually all over the board. An airbrush would have worked too, but I didn’t have one.
*Nov 2022 Update: Duff Cake Graffiti Spray is no longer available.
We made the dental tools with fondant and painted them with silver pearl dust. I heard the cake was a hit and she’s going to try to make a cake on her own next. I loved teaching her and sharing all I knew.
The cake recipe is adapted from MacsMom's Lemon Cake recipe (CakeCentral.com). I modified the cake to include Pink Lemonade concentrate. With this recipe, you can easily adapt the liquid and flavoring extract for any cake flavor you need. You can get creative with it and it's basically foul-proof since it starts with a box mix. The base recipe can be found online under the name, WASC Cakes (White Almond Sour Cream) and although there are many variations, they all start with a box mix that is doctored up with extra flavorings and ingredients.
Pink Lemonade Cake Recipe
Yield: 14 Cups
Ingredients:
2 Boxes of White Cake Mix
2 Cups Cake Flour2 Cups Granulated Sugar - minus 2 tablespoons sugar
1 1/2 Teaspoon Salt1 Teaspoon Baking Soda
1 1/3 Cups Frozen Pink Lemonade Concentrate1 1/3 Cups Water
2 Cups Sour Cream6 Large Eggs
1/4 Cup Vegetable or Canola Oil1/2 Teaspoon Vanilla Extract
1/2 Teaspoon Lemon Extract
Directions:
Preheat the oven to 325°F (162°C). In a large bowl, mix all dry ingredients by hand using a whisk. In a separate bowl, mix all the wet ingredients just until combined. Add the wet ingredients to the dry ingredients and beat on low speed for 2 minutes. Fill cake pans and bake as per below or until a toothpick inserted into the middle of the cake comes out clean or with very few crumbs.
Baking Times:
Cupcakes bake for about 18-20 minutes
Cake Pans bake for about 25-30 minutes


.jpg)
.jpg)
.jpg)
