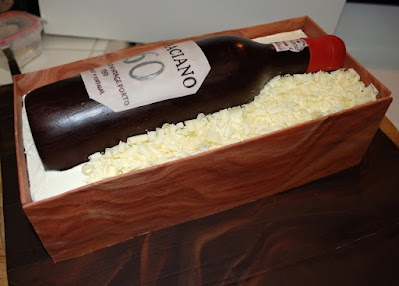
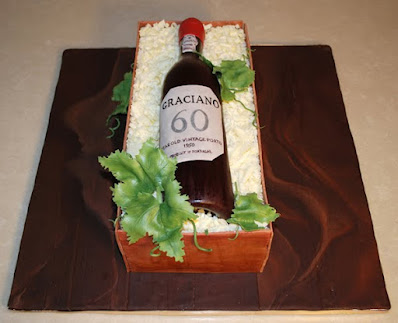
My dad is Portuguese and loves drinking a daily glass (or two) of red wine. For his 60th birthday, I decided to surprise him with this cake. Not knowing anything about how to even go about in making a wine bottle, IN CAKE, I tossed some ideas around in my head and below is a brief explanation on how I went about to make it. I was honestly surprised that I was able to pull this off, and as for my dad, he had tears of joy, and just couldn't believe the bottle was sugar and not a real bottle of wine (hmmm, maybe he really wanted it to be a real bottle of wine - LOL!)
I felt a little bad in that the cake was getting more attention and was being photographed more than the birthday boy but in the end, I was extremely happy that they all loved it. I learned a lot along the way for this being my sugar sculpture and 3D sugar-bottle, so alas, below is the entire process documented as best as I could capture. I have also included some tips so if you were to try making one, you can avoid making the little mistakes I made.
Disclosure: This post may contain affiliate links and if you click on the link and purchase the item, I may receive an affiliate commission at no extra cost to you.
Step 1 - Make the wine bottle out of gumpaste or fondant at least 3 days ahead - it needs to dry nicely:
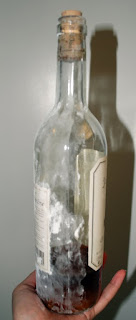
I used a real wine bottle as a mold that I dusted with corn starch to keep the fondant from sticking to it...a lot of corn starch. I actually used Marshmallow Fondant (aka MMF, see this link for my recipes) but I'll just "call" it fondant here for ease. Kneaded some brown fondant with Tylose Powder (the Tylose helps fondant dry harder and faster, or you can use straight, Gumpaste), rolled it out to about 1/8" thick, then lay it over the side half of the wine bottle making sure there was plenty of corn starch in between the fondant and glass bottle. Then, I lightly pressed and smoothed out the fondant into shape over the glass bottle, and trimmed off the excess.
Tip 1: Be sure to trim it at the half way mark down the side of the bottle so that you can just slip the fondant off the bottle once dry. You can make 2 halves separately then glue them together with sugar glue if you want a 3D, standing bottle.
As you can see, my bottle was not very neat and I should have made a better effort at trimming the excess off straighter but when I place it on the cake, I hid the jagged sides with chocolate shavings.
Tip 2: Allow at least 2-3 days for drying time to avoid the MMF from losing its shape.
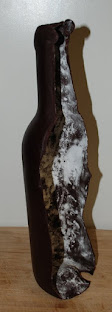
As impatient as I was, and eager to see how the fondant bottle was drying, I pulled it off the glass bottle after 1 day of dry time. Big mistake! I couldn't put it back onto the glass bottle without risking it cracking since the edges kind of curled back into itself. It looked great, at 1st, but a couple days later, the bottle warped a little along the edges as it dried further, and the neck curved a little to the right. I should have left the bottle as is to dry for at least 2-3 days before de-molding it. I had to disguise the curve in the neck with careful placement of the grape leaves (wink, it'll be our little secret, but you can see the curvature in the picture below).
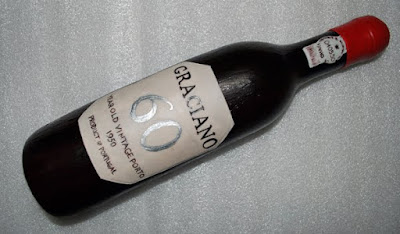
The bottle was painted with clear piping gel (recipe is at the bottom) that I tinted with Burgundy AmeriColor Soft Gel Paste. Using piping gel was an attempt to try and get a glossy-looking, bottle. The piping gel was a little thick so I thinned it out with some almond extract which helped it brush on smoother, although, if you really look, you can see some of my brush strokes. You can also use Vodka or lemon extract instead of the almond extract as a thinning medium, or anything that will evaporate quickly and not leave a sticky residue behind. I've heard of spraying edible lacquer to get it to shine, but going out to try and find very specific sugar-decorating supplies at a local store is near impossible (it's 2010 and finding caking supplies was not as easy as running down to your local craft supply store or ordering it online). For the label, I mixed burgundy and black gel colors with almond extract and painted the lettering freehand. I used a very thin brush and it took me 2 hours to get the lettering painted...way too long but then again, I'm a bit of a perfectionist and I wanted it to look as close to a printed label as possible. A half hour of it, was spent on the silver portion since I had to keep layering the edible, silver dust layer upon layer, until it was solid and stood out nicely.
Tip 3: I find with using straight black gel colors (AmeriColor Soft Gel Paste, Super Black), it has a green tint when you thin it out and attempt to paint with it, so if you mix a little burgundy gel coloring to it, you get a nice, deep, true black.
Tip 3: I find with using straight black gel colors (AmeriColor Soft Gel Paste, Super Black), it has a green tint when you thin it out and attempt to paint with it, so if you mix a little burgundy gel coloring to it, you get a nice, deep, true black.
Step 3 - Make the wood panels for the box and for the base board at least 2 days ahead:
For the side panels of the box, I mixed 2 shades of fondant, a batch of light brown, and another batch of beige made by mixing a little bit of yellow and red gel colors to give it some variance like you would find on a piece of wood. I then rolled out each color of fondant into a long, thick snake, twist them together, the kneaded it about 3-4 times to create a marbled effect in the fondant. I then rolled out the fondant to about 3/16" thick and wide enough to cut out the wood panels from.
Tip 4: Don't knead the fondant too much after mixing in the 2 colors of fondant, or else the marble effect will blend away. As you roll out the fondant into a flat slab, you create more marbling into it anyways.
Tip 5: Don't roll out the fondant too thin or else you risk the panels from breaking apart. Your goal is to make it look like slabs of wood and like a crate or wooden box.
I cut out 4 panels: 2 panels at 14" x 4" and 2 panels at 6" x 4". Lay them over parchment paper, then over a cookie tray to dry. If you have foam sheets, use that instead to aid in drying out the fondant slabs faster. After letting the fondant slabs rest and dry for 5 minutes, take some tools and score lines across the slabs, stab or poke holes into it, dent it, etc...just stress it out and develop that woodgrain look across each fondant slab.
Tip 6: Letting the fondant sit for a couple minutes before scoring and marking it, will help the design stay in place. If you start scoring it too early while the fondant is too soft and pliable, the marks will smooth away.
As for the base board, I used a 14" x 14" slab of marble tile since I knew I was going to get it back. I washed it thoroughly, taped 4 play dough container lids to the bottom of the tile to act as feet (benefits of having kids and finding ways to reuse what I had...they worked perfectly), then covered the entire tile, top and bottom, with contact paper (the stuff you use to line your drawers with). Although heavy, it was very solid and sturdy.
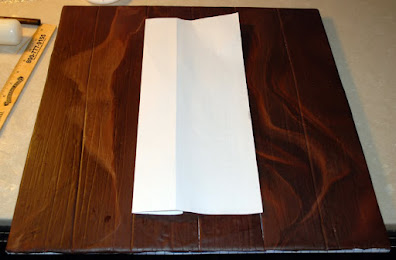
I then covered the base using dark, chocolate brown fondant marbled with the left over fondant pieces used to make the crates side panels. I rolled out the fondant, covered the board into 4 sections. In the photo above, I used a piece of paper (14" x 6") to give me an idea of where the cake was going to be placed. I then used piping gel to help the fondant adhere to the board, then let it sit for a few minutes before scoring and marking it up to create the woodgrain affect. This step can be done a few days ahead to give the baseboard time to dry rock hard.
Tip 7: I should have cut the fondant into 2.5" wide panels and lay them in alternating sections across the board so that the marbling would alternate and give the illusion of real plank floors. I just scored the design of each panel onto the board and the marbling ran over across the panels which I did not like but oh well, live and learn.
Step 4 - Make the grape leaves at least 1 day ahead:
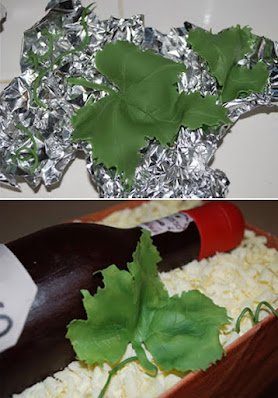
I made my own grape leaf stencil by sketching an outline on a sheet of paper then laid it over a piece of thinly rolled out green fondant (be sure to dust the back of the paper with corn starch to keep it from sticking to the fondant). Then used a pointed tool to trace out the outline over the fondant. Peeled off the paper, and then cut out the design. I then used a very small, 1/2" star shaped cutter, to roughly stamp out the edges around each leaf. Used a ball tool to smooth and slightly curl the edges over a cell pad, then laid the leaf over crinkled foil to dry. I rolled out thin snakes of fondant for the twigs, twisted some around some round chopsticks and lay them over the foil to dry. After they dried overnight, I dusted them with moss green and sunflower edible petal dusts, then steamed them for the color to stick and give them a little shine.
Step 5 - Bake, torte, fill, and crumb coat the cake 1 day ahead:
The side panels of the crate were cut to make a box 14" L x 6" W x 4" H. Since I had only a 9x13 pan, I baked 2 cakes then trimmed them down to 6" wide and used the extra to add to the length. Torte each layer to 1-1/4" tall and filled with 1/2" of Mango Mousse = 3" tall cake. I placed the cake over a 14"x6" board that was covered in foil (the board I used was just a piece of card board and for it to be food safe, I covered it in foil = peace of mind). Used piping gel to help the cake and board stick together. Wrapped the cake up tightly in cling wrap, then put the cake back into the fridge for the mousse filling to set overnight. The following day, I covered the cake with Italian Meringue Buttercream (aka IMBC, recipe can be found under this post, Music Themed 80th Birthday Cake) using the board that the cake was sitting on as a guide to getting the correct size. Put the cake back in the fridge for at least 1/2 hour for the IMBC to harden and make it easier to work with. IMBC does not crust; it's just like butter where it is hard while cold but soft at room temperature. I needed the IMBC to be hard so I can set the side panels on the cake and be able to take them off to trim them to size without taking the frosting off with it.
Step 6 - Final Assembly:
Use a very sharp blade to trim each panel to size then gently press the panels up against the sides of the cake. As the IMBC comes back to room temperature, the fondant will stick to it better. Gently place the bottle into the middle of the cake and fill the area around it with white chocolate shavings. Place grape leaves and twigs around using piping gel where needed to help it stay all stay in place and that's it, a Wine Bottle In a Crate and it's all edible...yum!
Piping Gel Recipe:
- 1 Tbsp Gelatin (1 envelope)
- 1 Tbsp Water
- 1 Cup Corn Syrup
- Directions: In a small pot, add the gelatin and water and let it sit for 5 minutes for the gelatin to soften and absorb the water. Add the corn syrup and heat, on low, stirring continually until it's all blended together evenly and the gelatin is completely melted. Remove from heat, scrape off any foam that might have developed while heating, transfer to an airtight container, and store in the fridge until ready to use.

.jpg)
